Feeds:
Posts
Comments

I was away last week on a yoga retreat in the beautiful Berkshires.  That meant eating vegetarian and super healthy the whole time.  For meals and snacks, thats fine with me on the overall.  But no dessert.  No butter, no fat, no chocolate.  I finally escaped at one point and found myself a buttery, nut-filled, chocolate chip cookie.  Maybe I’m not the best yogi, but I’m realistic about my need for a tasty dessert every once in a while.  Come on, honesty, what is life of peace and centeredness without chocolate and butter?

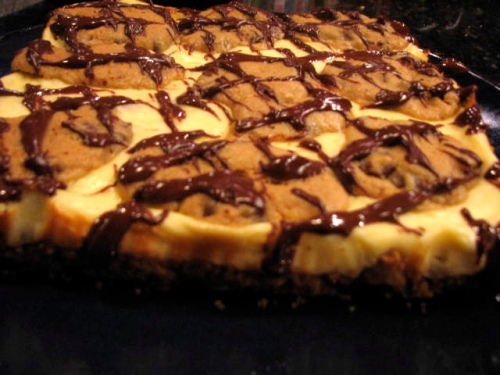
These bars are pure indulgence.  Just the name alone – Chocolate Chip Cookie Cheesecake Bars.  It’s a combination of two amazing desserts – cheesecake and chocolate chip cookie dough.  A special thank you to Bake or Break for this over-the-top recipe.  It begins with a graham cracker crust, a layer of cheesecake topped with dollops of chocolate chip cookie dough and completed with drizzles of melted chocolate.  I had an embarassing semi-homemade moment in making these bars and used store-bought refrigerated chocolate chip cookie dough.  If you don’t want to dirty another bowl, just buy the log of chocolate chip cookie dough and go for it.  I had enough dough leftover for a dozen big cookies that I dunked in the remaining melted chocolate.

You need to cool these bars completely before digging in.  I made mine the night before having people over and stashed them in the back of the fridge so I couldn’t pull them out as a late night snack.  After cooled for at least an hour in the fridge, I recommend cutting the squares small, these are rich and sweet.

Chocolate Chip Cookie Dough Cheesecake Bars

from Bake or Break

Crust

  • 1 & 1/2 cups grahamcracker crumbs
  • 5 Tablespoons unsalted butter, melted
  • 2/3 cup miniature semisweet chocolate chips
 

1.  Preheat oven to 325°. Butter a 9″-square baking pan. Line pan with parchment paper, leaving enough to extend over the sides. Butter the parchment paper.

2.  Combine graham cracker crumbs and butter until crumbs are moistened. Stir in chocolate chips.

3.  Press crust mixture into bottom of pan and 1 inch up sides. Bake for 6 minutes. Set pan on wire rack to cool

Cookie Dough (if you’re not using the store-bought dough)

  • 5 tablespoons unsalted butter, at room temperature
  • 1/3 cup packed light brown sugar
  • 3 Tablespoons granulated sugar
  • 1/8 teaspoon salt
  • 1 teaspoon vanilla extract
  • 3/4 cup all-purpose flour
  • 1 cup semisweet chocolate chip
1.  Using an electric mixer , mix butter, brown sugar, sugar, salt, and vanilla extract at medium speed until smooth. Decrease mixer speed to low and add flour. Mix just until incorporated. Stir in chocolate chips. Set aside.
Cheesecake Filling
  • 10 ounces cream cheese, at room temperature
  • 1/4 cup granulated sugar
  • 1 large egg, at room temperature
  • 1 teaspoon vanilla extract

1.  Using an electric mixer, beat cream cheese and sugar just until smooth. Add egg and vanilla extract, beating just until blended.

2.  Pour batter into baked crust. Drop cookie dough by teaspoonfuls over the top of the filling.

3.  Bake about 30 minutes, or until set. Transfer to wire rack.

**For chocolate topping, melt 1/3 cup semisweet chocolate chips in a double boiler or in the microwave. Add about 1/2 tablespoon of butter if necessary to make chocolate smooth. Drizzle over top of bars. Cool bars in pan completely, about an hour.

Using the edges of the parchment paper, remove bars from pan. Cut into bars and serve.

Okay, it’s been forever.  I don’t know what happened.  I’ve been away on trips and when I’m home, I haven’t felt like sitting at my computer to blog.  But yesterday, I visited our local CSA and there are so many beautiful, interesting, and inspiring veggies that I need to write about!  Zucchini isn’t that unusual but there is a cool sunburst squash that I plan on stuffing tomorrow night.  I originially bought two long zucchinis to make zucchini bread but after reading this recipe in Cooking Light, I decided to give it a try.

These cannot be mistaken for french fries but they are still really good – and much better for you.  The zucchini is crunchy and complimented well with the zesty sauce.  I found these adorable mini red, yellow, and orange peppers and I roasted them in the oven for the romesco sauce.  After roasting the peppers, I pulsed them in a food processor with some tomato sauce and fresh herbs from the garden.  

Parmesan Zucchini Sticks with Roasted Romesco Sauce

adapted from Cooking Light, July 2008

Parmesan Zucchini Sticks

  • 3 large zucchini (about 1 1/2 pounds) 
  • 1 cup dry breadcrumbs 
  • 1/2 cup panko (Japanese breadcrumbs) 
  • 1/4 cup (1 ounce) grated fresh Parmesan cheese 
  • 1/2 teaspoon salt 
  • 1/2 teaspoon freshly ground black pepper 
  • 3 eggs, beaten 
  • Cooking spray 

Roasted Romesco Sauce

  • 2 medium red peppers (or 5 mini ones)
  • 3/4 cup of tomato sauce
  • 1 clove of garlic
  • 1 tbsp fresh herbs – basil, parsley, chives, etc
1. Preheat broiler.2. To prepare sauce, cut bell peppers in half lengthwise; discard seeds and membranes. Place bell pepper halves and tomatoes, skin sides up, on a foil-lined baking sheet; flatten bell peppers with hand. Broil 10 minutes or until blackened. Place in a zip-top plastic bag; seal. Let stand 15 minutes. Peel and coarsely chop, reserving any liquid. 

3. Combine bell peppers, reserved liquid, tomato sauce, garlic, and fresh herbs in a blender or food processor; process until smooth.

4. Preheat oven to 400°.

5. To prepare zucchini, cut 1 zucchini in half crosswise; cut each half lengthwise into 8 wedges. Repeat procedure with remaining zucchini. Combine breadcrumbs, panko, cheese, 1/2 teaspoon salt, and black pepper in a shallow dish. Dip zucchini in egg; dredge in breadcrumb mixture. Place zucchini on a wire rack coated with cooking spray. Lightly coat zucchini with cooking spray. Bake at 400° for 25 minutes or until golden brown. Flip zucchini halfway through cooking time.  Serve immediately with sauce.

I love salads.  The problem is that I quickly get bored with the same old thing.  Apple and blue cheese.  Cobb.  Caesar.  They are all good but I’ve eaten these salads a thousand times.   The farmers markets here are turning out all kinds of fresh lettuce and greens for good salad making.  This is a very simple recipe but it has a great balanced flavor.

I made this salad twice, once with toasted sunflower seeds and the next with pecans.  Both are delicious so use whatever seeds or nuts you have around.  Toasting them first helps provide more crunch and a nuttier flavor.  The grapes provide good antioxidants. 

Arugula, Grapes, and Pecan Salad

Adapted from Cooking Light May 2008

Dressing:

  • 3 tablespoons red wine vinegar
  • 1 teaspoon honey
  • 1 teaspoon maple syrup
  • ½ teaspoon stone-ground mustard
  • 2 teaspoons grapeseed oil
  • 7 cups loosely packed baby arugula
  • 2 cups red grapes, halved
  • 2 tablespoons toasted pecans
  • ¼ tsp salt
  • ¼ tsp freshly ground pepper
  1. Combine vinegar, honey, syrup, and mustard in a small bowl.  Gradually add oil, stirring with a whisk.
  2. Combine arugula, grapes, and nuts in a large bowl.  Drizzle vinegar mixture over arugula; sprinkle with salt and pepper.  Toss gently to coat.  


Okay so mozzarella making is both easy and not so easy.  I ordered a starter kit from the Cheese Queen  for making mozzarella and ricotta.  It’s supposed to take 30 minutes but it took me 2 hours.  It also took my kitchen by storm.  I had cheese curd everywhere in my kitchen.  I was cleaning cheese curds from the floors, counters, endless bowls and pots. But despite the setbacks, I actually made an edible ball of mozzarella cheese!  And it was delicious – so fresh, soft, and amazing. 


My problem was that the cheese did not fully curd.  It is supposed to become firm enough to cut and scoop out into a bowl.  It did curd and separate from the whey, it just didn’t firm up enough.  So I used cheesecloth to strain the whey out so I could go on making the cheese.  With this kit I bought, it’s really not difficult to make homemade mozzarella if everything goes according to plan.  They key is good milk.  A gallon of pasteurized, not ultra-pasteurized and the fresher the better.  The kit provided me with citric acid and rennet needed for making the cheese.  The fun part is stretchy the mozzarella out so that it gets that wonderful stringy texture. 

With my hard-won mozzarella ball, I made caprese salad, an absolute fav meal for me.  And I made this grilled margarita pizza. Nothing beats homemade pizza on the grill.  It gets crispy and you can easily add ingredients while it cooks unlike when baking in an oven.  I don’t use a pizza stone, I just throw it on the grill.  When one side has cooked, I flip it over, add my ingredients, close the cover, and in 5 minutes, the cheese is melted and the crust is crispy.  This was probably my favorite pizza yet – I bought the freshest tomatoes I could find, the homemade mozzarella, and garden grown basil.  Simple and satisfying.


Grilled Margarita Pizza


  • 1 ball of pizza dough (white or whole wheat)
  • 1 ball of fresh mozzarella (smoked mozzarella is delicious on pizza), sliced
  • 1 ripe tomato, sliced
  • 1 bunch of basil
  • extra-virgin olive oil
  • sea salt & freshly ground pepper
  1. Heat grill to medium heat.  Cut your ball of pizza dough in 4 sections.  Roll each section out into 4 thin circles or whichever shape you like (I usually do random shapes).
  2. Place the dough directly on to the grill rack (or you can use a pizza stone if you prefer).  Wait until some bubbles form and then flip the dough over. 
  3. Brush extra-virgin olive oil onto the dough.  Layer slices of fresh mozzarella and tomato.  Top with salt and pepper.  Close the grill cover to allow the cheese to melt for 3-5 mins. 
  4. Take grilled pizza off the rack, add fresh basil and a little more extra-virgin olive oil.  Enjoy!

Sorry for the lack of posts this week….It’s been pull-my-hair-out busy and I leave tomorrow for a trip to Maine.  I promise a great post next week about my experience with cheese making and an amazing grilled margarita pizza that resulted.  

Summer Fruit Tart

Finally, it is feeling like summer here.  We have actually had a  week in the 70’s with some sun here in the Northeast.  Some times I think I’m crazy for enduring this crazy weather.  I went to a Red Sox game two weeks ago wearing a winter coat and hat.  And I was still cold.  But there is a light at the end of the tunnel and the sun is warming up these cold New England bones. 


To celebrate the warmth, I’ve been buying strawberries and blackberries even though they have to get shipped here from hundreds of miles away.  I had some in my fridge and I really wanted to make a tart or cobbler.  The berries looked too beautiful to not put them on display, so I decided to throw a few ingredients together for a tart. I made a press-in-the-pan shortbread crust, which was super simple and came together quickly in the food processor.  Then I made a sweet cream-cheese filling, spread it on the baked crust, and decorated it with some berries.  I can imagine most summer fruits looking beautiful and on display with this tart.  Use whatever is fresh and available in your area and get as creative as you’d like with cutting and placing the fruit on the tart.  In order to get a nice shimmer and some added flavor, I brushed warm apricot jam all over the fruit. 


Pat-in-the-Pan Shortbread Crust

Adapted from Joy of Cooking

  • 1 1/2 cups all-purpose flour

  • 1/3 cup sugar

  • 1/4 tsp. salt

  • 1 stick of butter
  • optional: egg yolk
  1. Preheat the oven to 400 degrees.
  2. Mix the flour, sugar, and salt together. Using your hands, a food processor, a pastry cutter, or two knives, work/cut the butter into the dry ingredients. The mixture should look like cornmeal with a few larger lumps of butter.
  3. If the mixture is too dry and crumbly, you can add an egg yolk to bring it together.
  4. Pat the crust into a 9″ or 10″ pie or tart plate. Prick all over with a fork and chill for an additional 20 to 30 minutes.

  5. Bake the crust for 15 – 18 minutes, or until it starts to become golden brown.


Cream-Cheese Filling

  • 1 package of cream cheese (use full fat or 1/3 fat), softened
  • 1/3 cup of sugar
  • optional:  lemon zest or vanilla extract
  1. Beat cream cheese and sugar together in mixer or food processor.  Once it is creamy and the sugar is fully incorporated, then refrigerate until the crust has fully cooled.
  2. Once the crust has cooled, spread the cream cheese mixture over the crust and then decorate with fruit.

Fruit Topping:

  • Whatever combination of berries you wish – strawberries, blackberries, blueberries, raspberries, etc.
  • Apricot jam
  1. Use enough fruit to cover the tart.  In the summer, berries are the best and easiest to work with – blackberries, blueberries, strawberries, raspberries, etc.  Use whatever combination works best for you.  Decorate and arrange however you wish. 
  2. Warm 2 tablespoons of apricot jam in the microwave.  Brush jam on the berries and the edges of the tart crust.
  3. Keep tart in refrigerator until ready to serve.


Name that Vegetable

Help me out here.  I purchased this unknown veggie at an Asian food store.  I had  very high hopes that I had discovered and found the vegetable – ramps – which I have been looking all over for.  The only sign was written in Chinese and when I attempted to communicate with those who worked there, an older woman guessed it was chives.  These don’t look like chives to me.  I’m growing chives in a few pots on my deck and they are thin and tubular.  These are much thicker and wider on the top.  

To prepare what I thought might be ramps, I quickly blanched them and added a home made roasted red pepper sauce.  But then we tasted it and it was weird.  Exactly like eating grass.  I ate one bite and was done.  It did have an oniony garlicky taste but the consistency was not good.  Any ideas?  I had ramps, granted they were prepared at a restaurant, but they were delicious and did not resemble grass in the least.  Let me know if you have any thoughts on this mystery vegetable.  Until I find a well labeled bin for ramps, I’m going to restrain my search for fear of eating some other grassy-like vegetable.

Are these not adorable?  My best friend gave me this cute flower silicone pan for making cupcakes.  I love how there are three different shapes.   Even though, the cakes lose some of the pan’s details, I still think they are really cute and fun.  I made a lemon pound cake, which was lighter than other pound cakes and had a great consistency and lovely taste.  I made these for my sister’s graduation and I’m planning on making them again for her grad party.  I frosted them with a lemon glaze and some simple sprinkles.  Let me know if you have any suggestions about how to decorate or frost cakes from decorative pans such as this one.  It was my first experience and as you can see, I just dripped some glaze over the top and sprinkled them.


Powdered Sugar Pound Cakes

Adapted from the Pampered Chef

If you are looking to making more  a lemon cake, you can feel free to add some from fresh squeezed lemon to the batter.  You can also add mix powdered sugar with lemon juice for a lemony glaze.


  • ¾ cup butter, softened
  • 1 ¼ cups powdered sugar
  • 2 eggs
  • ¼ cup sour cream
  • ¾ tsp vanilla
  • 1 cup all-purpose flour
  • 1/8 tsp salt
  1. Preheat oven to 350 degrees F.  Lightly spray cupcake or loaf pan with nonstick spray.
  2. Combine butter and powdered sugar.  Beat on high speed of electic mixer until mixture is fluffy, about 2 minutes.  On medium speed, add eggs, one at a time, mixing well after each addition.  Fold in sour cream and vanilla. 
  3. In small bowl, combine four, baking soda, and salt.  Stir flour mixture into sour cream mixture just until incorporated.
  4. Place one level scoop of batter into each cupcake mold or fill a loaf pan until ¾ full.  Bake 18-22 mins or until light golden brown for the cupcakes.  Remove from the oven, cool 5 mins in the pan.  Then cool completely on a cooling rack.  Glaze cakes, if desired, with a mixture of lemon juice and powdered sugar. 


You’ll never go back to the bag.  These homemade potato chips are just that incredible.  They are a bit time-consuming, especially if you are cooking for a crowd but totally worth it.  The oil is infused with sage, rosemary, and garlic.  You’ll know the oil is hot and ready for the potatoes once the herbs have become crispy.  Remove the crisped herbs and put the potato slices in one at a time.  After they turn brown, take them out of the oil, lay on a paper towel, and sprinkle with sea salt.  You need to sprinkle with sea salt or whatever other toppings or spices while they are still hot.  Experiment with whatever herbs you prefer (I suggest ones that are more woody and earthy) or top with parmesan after cooked.


In order to get the thinnest potato slices, use a mandoline, a food processor, or a vegetable peeler.  I suggest using Yukon Gold potatoes but feel free to experiment or use what you have in the kitchen.  I deep fried these potatoes for the full potato chip experience, but try baking them for a healthier alternative and let me know how they come out! 


Sage & Rosemary Infused Kettle Chips

  • 6 large Yukon gold potatoes
  • Canola oil and olive oil, 75/25 ratio for frying
  • 6 whole cloves garlic
  • 4 sprigs fresh rosemary
  • 1/2 bunch sage
  • Sea salt and freshly ground black pepper

1.  Wash and clean the potatoes in cold running water. Using a mandoline, food processor, or vegetable peeler, finely slice the potatoes into chips. Drop the chips into a bowl of ice water as you work to prevent them from going brown. This will also remove any excess starch.

2.  Set a large pot of 75/25 canola and olive oil over medium heat and add the garlic (paper and all) and whole stems of fresh rosemary and sage.. Bring oil up to 375 degrees F. As it heats up the oil will get infused with the garlic and herbs. Once the herbs crackle and get crispy and you know they are done. Remove the herbs and garlic and set aside on paper towels.

3. Fry the potatoes in batches until golden and crispy. Drain the chips, dry well on paper towels and season with salt and freshly ground black pepper. Garnish with crispy herbs and garlic.


In honor of this nice long Memorial Day weekend, I’m going to share my husband’s incredible Pulled Pork Barbeque recipe with you.  I don’t really do meats so if he is feeling a lack of animal protein, it’s up to him to grill up something up.  Last year, I gave him a stovetop smoker and he loves the combination of grilling and smoking.  Surprisingly this pork is neither grilled nor smoked, it’s cooked low and slow in the oven for about 3 – 4 hours.  So you do have to plan ahead but it’s also low maintenance.  Once you’ve applied the wet rub and have placed it in the oven, there’s nothing left to do once it comes out but just pull it apart with a fork and apply your favorite barbeque sauce.


After a 3 week road trip a few summers ago in which we ate the local barbeque in all the places we stayed, we have both grown to like our pulled pork sandwiches with coleslaw in the sandwich.  I experimented for the first time and made my own coleslaw.  It was really easy and worth it for a bigger crowd.  I made the coleslaw about the time that Sean put the pork shoulder in the oven so that the flavors could marinate together before serving but it wasn’t long enough to get soggy. 

We served this sandwich with homemade potato chips, which were absolutely amazing.  I’ll post that recipe on Monday in case you are looking to clog your arteries a little more over the long weekend.

Sean’s Pulled Pork Barbeque

  • 1 pork shoulder  (about 4 to 4 ½ pounds)

Wet Rub

  • 4 tablespoons kosher salt
  • 1 tablespoon freshly ground black pepper
  • 1 1/2 cups light brown sugar
  • 1/4 cup paprika
  • 4 cloves garlic
  • ½ cup of onion
  • 1/4 cup red wine vinegar
  • Scant 1 tablespoon cayenne
  • 3 tablespoons extra-virgin olive oil
  1. Place the salt, pepper, brown sugar, paprika, onions, garlic, vinegar, and cayenne in a food processor and pulse until well combined. Add extra-virgin olive oil until you have a nice paste. Rub all over the pork, being sure to get into the nooks so the salt can penetrate the meat and pull out the moisture – this will help form a crust on the outside when cooked. Cover the pork with plastic wrap and marinate in the refrigerator for at least 3 hours or up to overnight.
  2. Allow the meat to sit at room temperature for 30 minutes before cooking. Preheat the oven to 325 degrees F.
  3. Place the pork, fat side up, in a roasting pan fitted with a rack insert.
  4. Roast the pork for 3 1/2 hours, uncovered, until the outside is crispy-brown (it should look like mahogany).  Depending on the size, it might need to cook for longer.  Let the meat rest on a cutting board for 10 minutes before slicing.

Homemade Coleslaw

To cheat and make the chopping go quicker, I used a bag of broccoli slaw and a bag of chopped purple cabbage in addition to the carrots I sliced on the mandoline.  The flavor and crunch were great.  But if you want to really slice and dice, use ½ head of savoy cabbage and ½ head of purple cabbage.   You can also add fresh parsley or green onions.  Adjust the recipe to your taste and what you have in your pantry or garden.

  • 1 ½ tablespoon whole-grain mustard or a good quality Dijon mustard
  • 1 cup mayonnaise 

  • 1/4 cup sour cream 

  • 1/2 lemon, juiced 

  • 2 tablespoons apple cider vinegar 

  • 2 teaspoons sugar 

  • 1 bag of broccoli slaw 

  • 1/2 head purple cabbage, finely sliced 

  • 2 carrots, sliced on mandoline or julienned
  • Sea salt and freshly ground black pepper
  1. Combine the mustard, mayonnaise, sour cream, lemon juice, vinegar and sugar and mix well. 
  2. Add the finely sliced cabbage, broccoli slaw, and carrots to the dressing.  Mix well and season with salt and pepper to taste. 
  3. Cover with plastic wrap and allow the flavors to marinate.
  4. Serve when you are ready, cold or at room temperature.